写在最前面,前阵子收了一台笔记本电脑,sony的,固态盘还是触摸屏,小惊喜了一把,结果这个电脑的系统是win,每天自动更新,但是更新失败回退。搜了一些方法,但都不解决问题,终于找到下面这篇最全的。

前言:
Windows10的自动更新给工作带来很多不便,想关闭更新很难,我们经过多次尝试,基本找全了与更新有关的条目。
1、与更新有关的Windows服务,大致就这三个服务。
Windows update
Update Orchestrator UsoSvc(更新Orchestrator 服务)
Windows update medic service(更新医生服务)
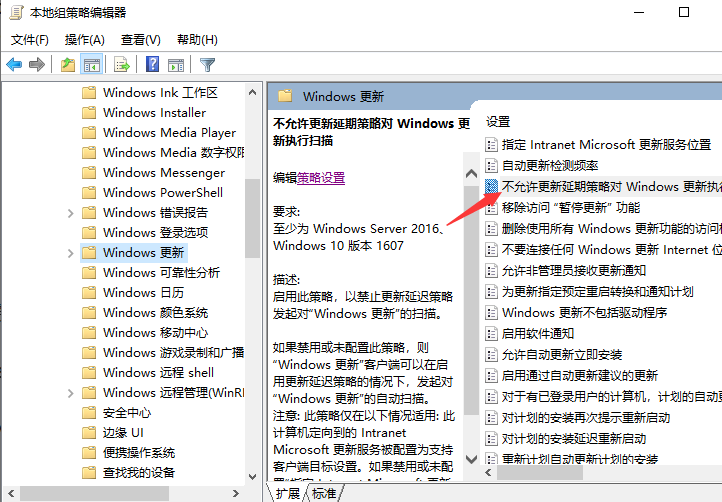
2、组策略
计算机配置 – 管理模板 -Windows组件 -Windows更新
3、计划任务
Microsoft -Windows -WindowsUpdate
以下内容(一、二、三)
一、禁用三大服务(三种方法)
1、手工操作停止禁用服务。
进入服务的方式很多,从此电脑右键属性-管理-可以找到。也可以从控制面板进入。
可以运行services.msc直接进入。
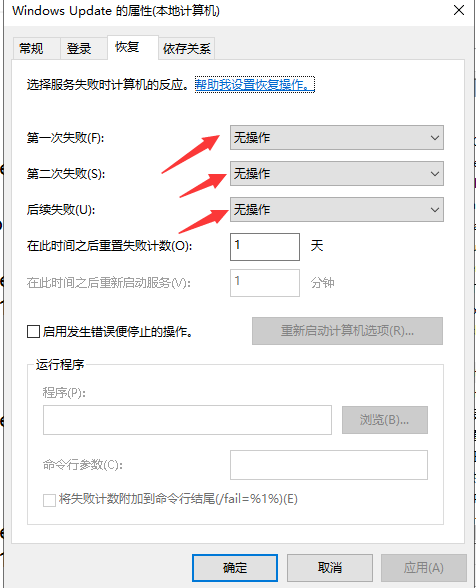
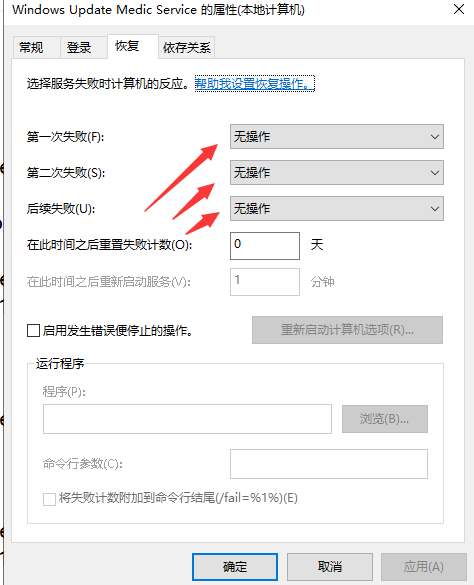
(1)、先停止Windows Update,后禁用。如图
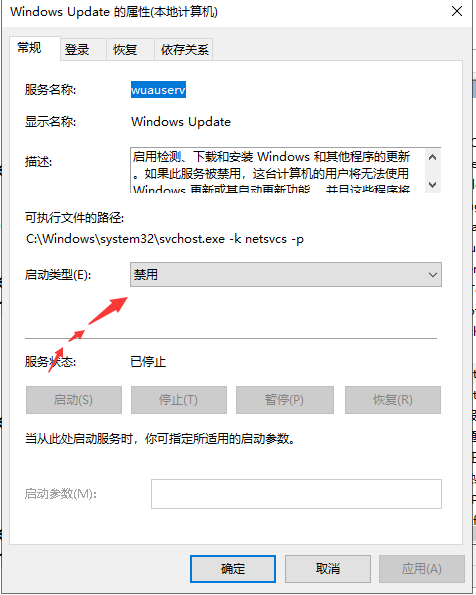
找到【恢复】页,改为无操作
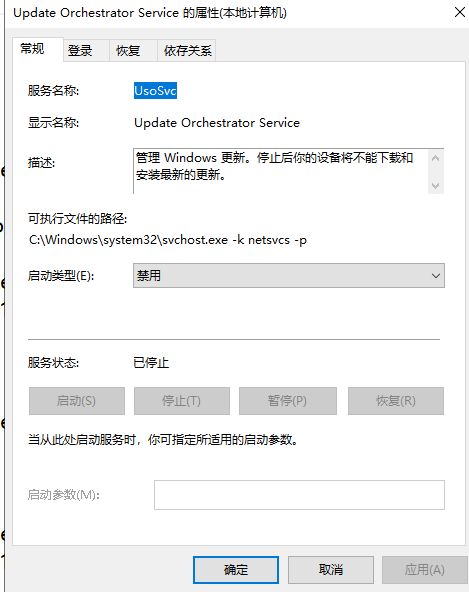
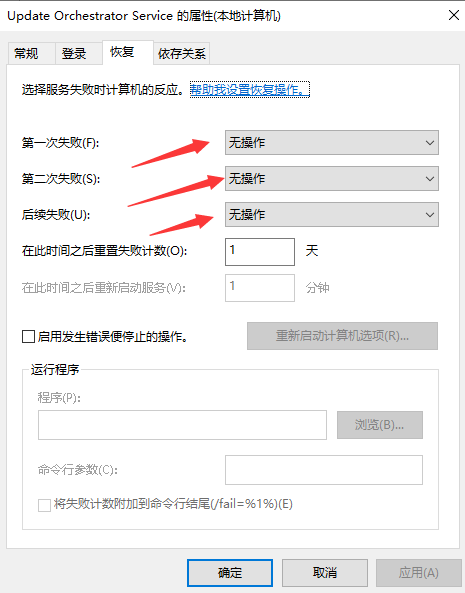
(2)、关闭 禁止 Update Orchestrator UsoSvc服务 更新适配Orchestrator服务
(3)、停止 禁用 Windows update medic service 更新医生服务
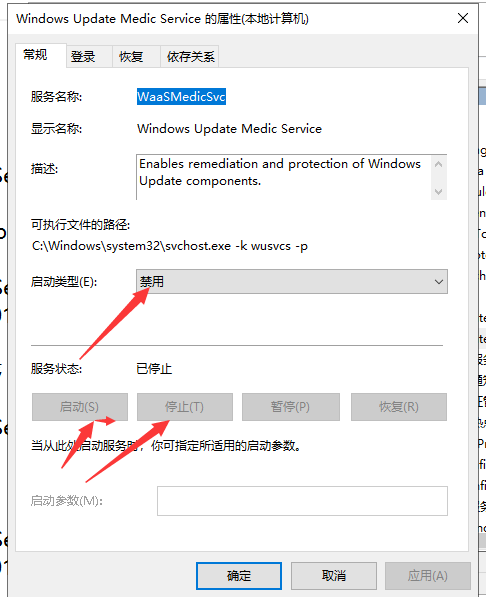
这个服务有时会拒绝访问或改不了。你就要参考下面注册表修改了。
2、注册表修改。(如果上面的修改的很顺利,就不必要再做这项的内容,手工修改和注册表修改是异曲同工,互相验证的关系)
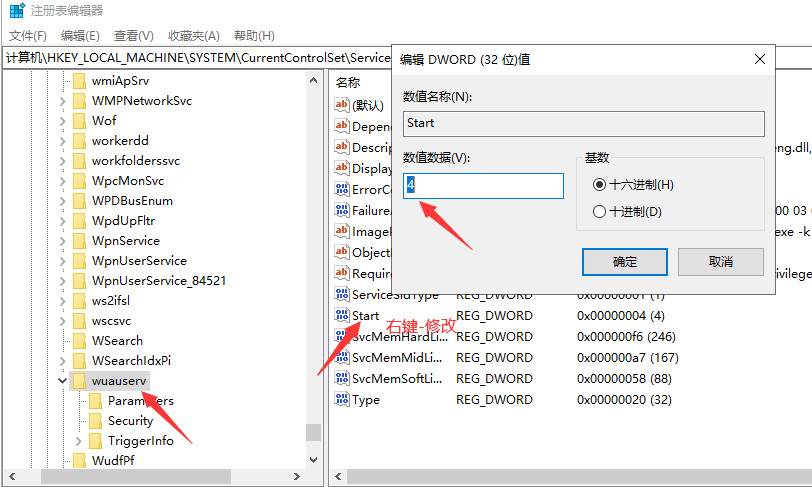
打开注册表,开始 运行 regedit
(1)、禁用 Windows update(第一个图是禁用更新,第二个图修改恢复里面的“无操作”)
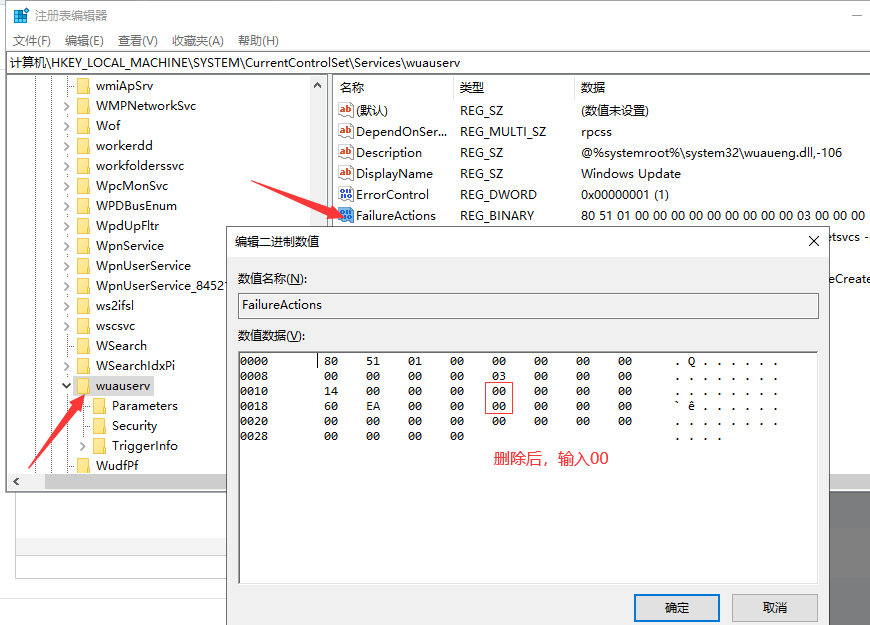
HKEY_LOCAL_MACHINE\SYSTEM\CurrentControlSet\Services\wuauserv
(2)、关闭 禁止 Update Orchestrator UsoSvc服务 更新适配Orchestrator服务
HKEY_LOCAL_MACHINE\SYSTEM\CurrentControlSet\Services\UsoSvc
这项的改的地方同(1)。只是注册表位置不一样。【UsoSvc】
(3)、停止 禁用 Windows update medic service 更新医生服务
HKEY_LOCAL_MACHINE\SYSTEM\CurrentControlSet\Services\WaaSMedicSvc
这项的改的地方同(1)。只是注册表位置不一样。【WaaSMedicSvc】
3、运行命令修改。(这个要求稍微专业点的知识,高手可采用。但要先检查三个FailureActions的值你有没有特殊设置再用。)
net stop wuauserv
net stop UsoSvc
net stop WaaSMedicSvc
reg add “HKEY_LOCAL_MACHINE\SYSTEM\CurrentControlSet\Services\wuauserv” /v “Start” /t REG_DWORD /d 4 /f
rem ******** 停止 禁用 Windows update
reg add “HKEY_LOCAL_MACHINE\SYSTEM\CurrentControlSet\Services\wuauserv” /v “FailureActions” /t REG_BINARY /d 80510100000000000000000003000000140000000000000060ea000000000000000000000000000000000000 /f
rem ********“改服务里面恢复,00-无操作,01-重新启动服务 03-运行一个程序 02 -重新启动计算机 14后面00 00 00 XX”
reg add “HKEY_LOCAL_MACHINE\SYSTEM\CurrentControlSet\Services\UsoSvc” /v “Start” /t REG_DWORD /d 4 /f
rem *******停止 禁用 Update Orchestrator UsoSvc服务 更新适配Orchestrator服务
reg add “HKEY_LOCAL_MACHINE\SYSTEM\CurrentControlSet\Services\UsoSvc” /v “FailureActions” /t REG_BINARY /d 805101000000000000000000030000001400000000000000c0d4010000000000e09304000000000000000000 /f
rem *******“改服务里面恢复,00-无操作,01-重新启动服务 03-运行一个程序 02 -重新启动计算机 14后面00 00 00 XX”
reg add “HKEY_LOCAL_MACHINE\SYSTEM\CurrentControlSet\Services\WaaSMedicSvc” /v “Start” /t REG_DWORD /d 4 /f
rem *******停止 禁用 Windows update medic service 更新医生服务
reg add “HKEY_LOCAL_MACHINE\SYSTEM\CurrentControlSet\Services\WaaSMedicSvc” /v “FailureActions” /t REG_BINARY /d
840300000000000000000000030000001400000000000000c0d4010000000000e09304000000000000000000 /f
rem ******“改服务里面恢复,00-无操作,01-重新启动服务 03-运行一个程序 02 -重新启动计算机 14后面00 00 00 XX”
复制做成BAT文件,以管理员身份运行。
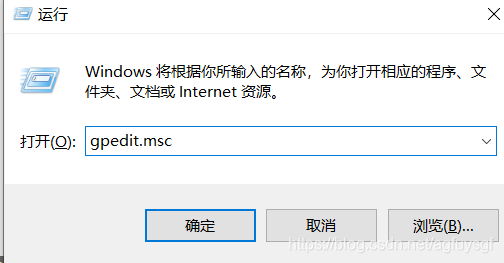
二、配置组策略:gpedit.msc
Windows10家庭版没有gpedit.msc,需要配置一下。首先要新建一个txt文件,打开,在里面输入以下内容并保存:
@echo off
pushd “%~dp0”
dir /b C:\Windows\servicing\Packages\Microsoft-Windows-GroupPolicy-ClientExtensions-Package~3*.mum >List.txt
dir /b C:\Windows\servicing\Packages\Microsoft-Windows-GroupPolicy-ClientTools-Package~3*.mum >>List.txt
for /f %%i in (‘findstr /i . List.txt 2^>nul’) do dism /online /norestart /add-package:”C:\Windows\servicing\Packages\%%i”
pause
将文件后缀改bat,随后右键点击以管理员身份运行,等待加载完成,就可以启用组策略了。
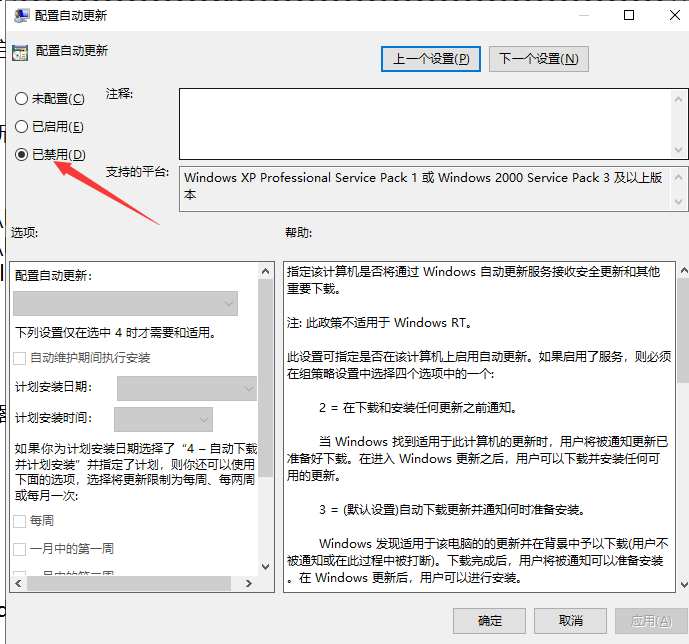
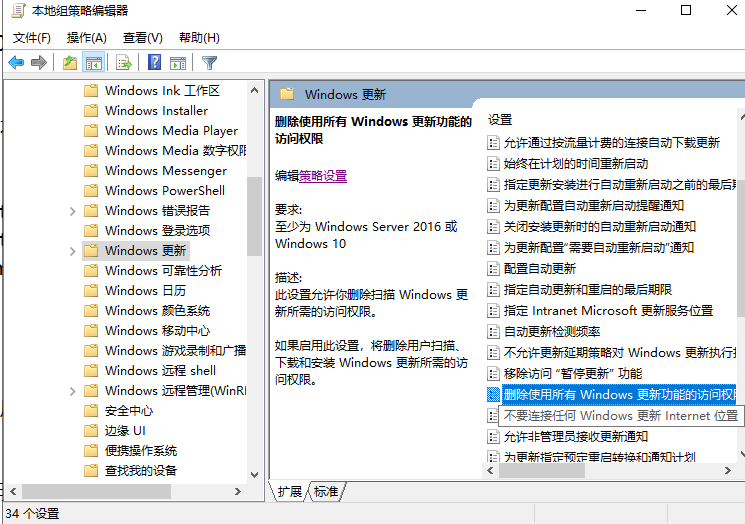
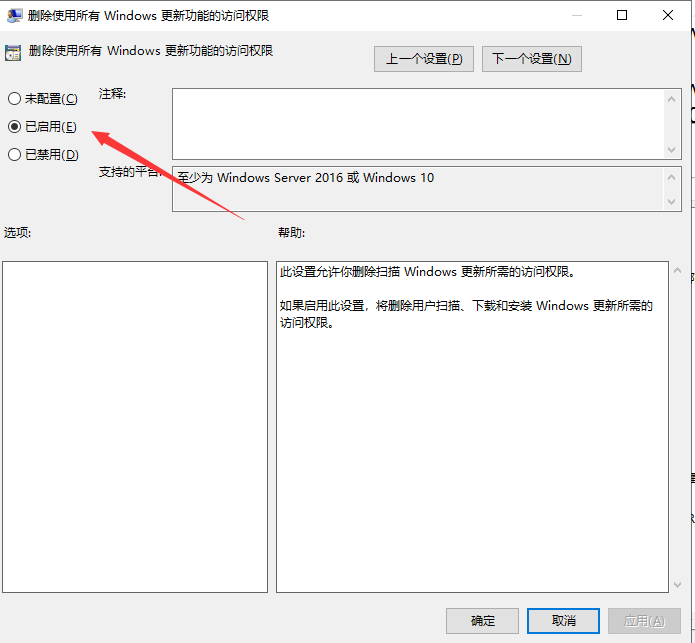
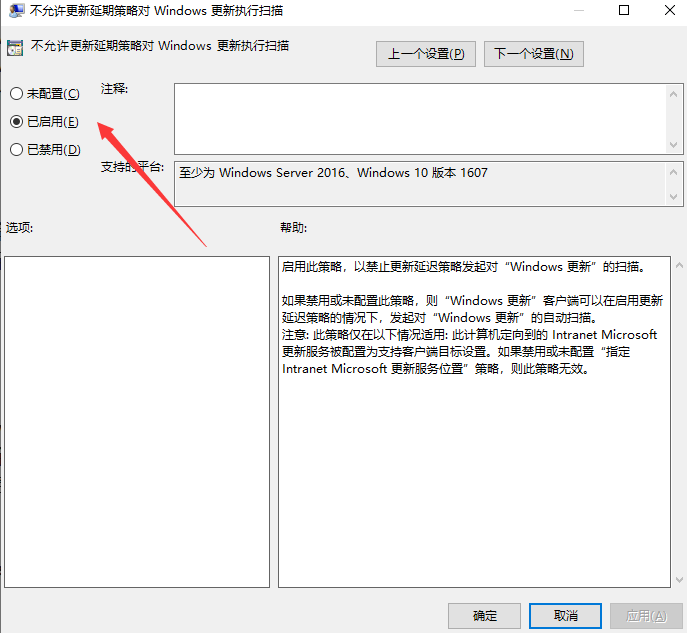
成功打开组策略编辑器后,在组策略编辑器中,按顺序点开:计算机配置 – 管理模板 -Windows组件 -Windows更新 ,在右侧配置自动更新设置中,将其设置为已禁用并点击下方的确定保存即可

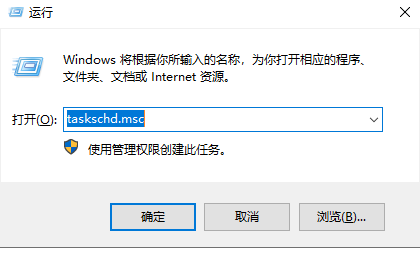
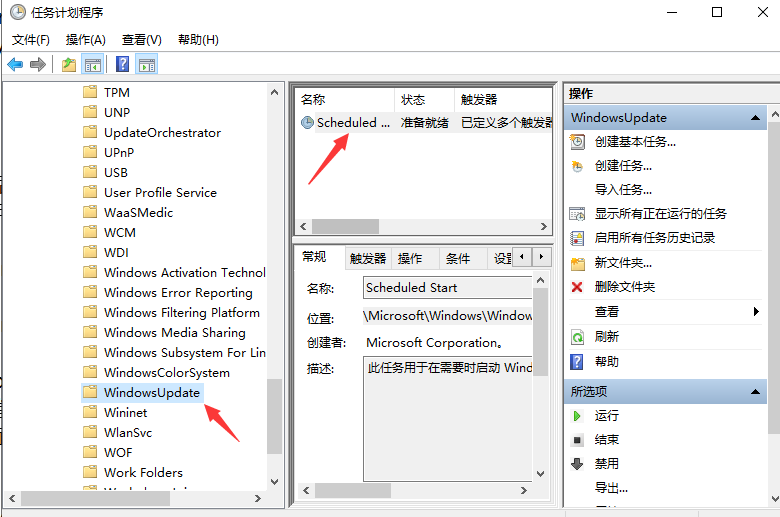
三、计划任务关闭windows更新:taskschd.msc
在打开的计划任务的界面中,按顺序点击 任务计划程序库 – Microsoft -Windows -WindowsUpdate,把里面的项目都设置为禁用,能删除也可以删除。
注【高手可操作】:计划任务删除命令是:schtasks /delete /tn “任务名称”
终于写完了,测试通过。作者:众嘉软件